
If you want to integrate custom drivers or updates into your VMware ESXi installation, you’ll need to create a custom ESXi ISO using PowerCLI. This approach gives you more flexibility and ensures your ESXi host includes all the required components right from installation.
In this tutorial, you’ll learn how to set up PowerCLI, install the right modules, and generate a customized ISO image — all using simple PowerShell commands.
Table of Contents
Step 1: Install the Correct Version of VMware PowerCLI
Before you start, make sure VMware PowerCLI is installed on your system. While version 13 is currently available, it has a few known compatibility issues with Image Builder. Therefore, it’s best to use version 12.7.
To install it, open PowerShell as an administrator and run the command below:
Install-Module -Name VMware.PowerCLI -RequiredVersion 12.7.0.20091289This will install the stable version of PowerCLI needed to build your custom ESXi ISO.
Step 2: Configure Python Path in PowerCLI
PowerCLI requires a proper Python environment for certain modules to function correctly.
First, ensure Python 3.7 is installed on your system. Then, set the Python path by running this command:
Set-PowerCLIConfiguration -PythonPath <python3.7-directory>\python.exe -Scope UserReplace <python3.7-directory> with your actual Python installation directory (for example, C:\Python37).
Step 3: Install the Compatible VMware Image Builder Module
The VMware.ImageBuilder module is used to build custom ESXi images. However, newer versions may cause errors during image creation.
To avoid issues, uninstall the existing Image Builder module and reinstall version 7.0.3.
Remove Existing Image Builder Module
Run the following command to uninstall:
Get-Module VMware.ImageBuilder | Uninstall-Module -ForceNext, navigate to the ImageBuilder directory and manually remove its contents:
C:\Program Files\WindowsPowerShell\Modules\VMware.ImageBuilderInstall Image Builder Version 7.0.3
After removing the old files, install the compatible version using this command:
Install-Module -Name VMware.ImageBuilder -RequiredVersion 7.0.3.19599828This ensures you’re working with a stable and supported version for ISO customization.
Step 4: Create a Custom ESXi ISO Image
Now that your PowerCLI environment is set up, you can build a custom ISO image that includes community network drivers or other additional components.
Here’s an example workflow to create a custom ESXi ISO using PowerCLI.
Import Image Builder Module
Import-Module VMware.ImageBuilderAdd Software Depots
Add both the base ESXi image and your custom driver package:
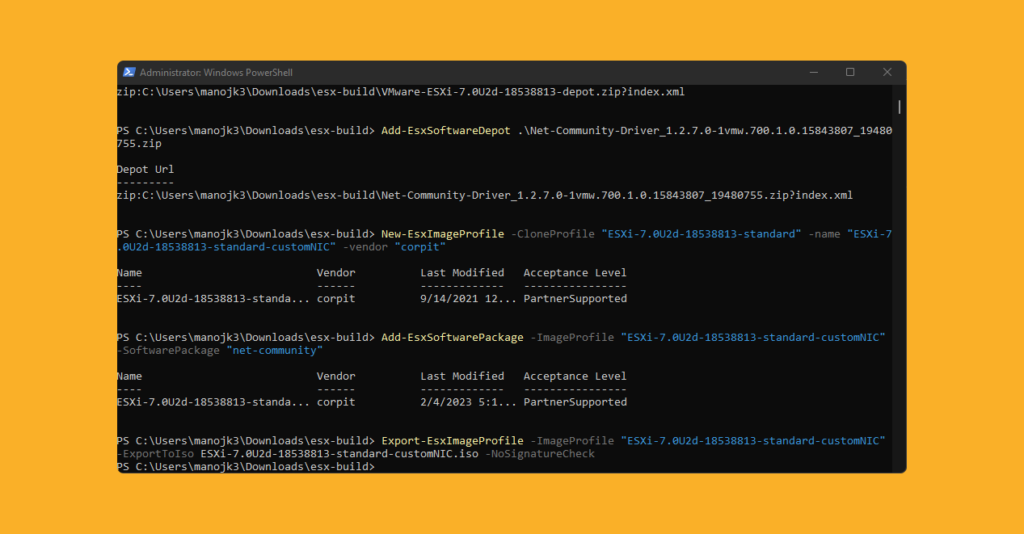
Add-EsxSoftwareDepot .\VMware-ESXi-7.0U2d-18538813-depot.zip
Add-EsxSoftwareDepot .\Net-Community-Driver_1.2.7.0-1vmw.700.1.0.15843807_19480755.zip
Clone and Customize Image Profile
New-EsxImageProfile -CloneProfile "ESXi-7.0U3i-20842708-standard" -name "ESXi-7.0U3i-20842708-standard-customNIC" -vendor "corpit"Add the Custom Network Driver
Add-EsxSoftwarePackage -ImageProfile "ESXi-7.0U3i-20842708-standard-customNIC" -SoftwarePackage "net-community"Export the Custom Image to ISO
Export-EsxImageProfile -ImageProfile "ESXi-7.0U3i-20842708-standard-customNIC" -ExportToIso ESXi-7.0U3i-20842708-standard-customNIC.iso -NoSignatureCheckOnce the commands finish executing, your custom ISO image will be created successfully. You can now use it to install ESXi with the integrated drivers and configurations.
Step 5: Verify Your Custom ESXi ISO
After building the ISO, verify it by mounting or booting from it in a virtual environment. Ensure that the new drivers or components you added are detected during installation.
If any issues arise, double-check the version compatibility of PowerCLI, Image Builder, and your driver packages.
FAQs About Creating a Custom ESXi ISO Using PowerCLI
PowerCLI is a command-line interface that allows VMware administrators to automate and manage vSphere environments efficiently.
Creating a custom ESXi ISO using PowerCLI lets you include network or storage drivers that aren’t part of the default ESXi image.
Version 13 has known issues with the Image Builder module, which can cause build failures. Version 12.7 is more stable for creating custom images.
Yes, you can add multiple software depots or driver packages using the Add-EsxSoftwareDepot command.
Check the PowerCLI version, Python path, and module compatibility. If problems persist, refer to the official VMware documentation for troubleshooting tips.
Conclusion
Creating a custom ESXi ISO using PowerCLI gives you full control over your VMware deployment. By following this guide, you’ve installed the correct PowerCLI version, configured your Python path, added the required Image Builder module, and built a functional custom ISO image.
With this process, you can streamline future installations, add necessary drivers, and ensure compatibility across your environment.


Sir, how to do the same in Linux?
You cannot do it from linux
Check this out maybe that will help
https://blog.zuthof.nl/2024/01/04/powercli-13-installation-hurdles-on-linux/